I found that the Ampro VGA board did not properly support 24 bit true color. (Even though it purported to, in hardware, it lacked the appropriate device drivers to do so.) Therefore, I have generally used a VGA board from another vendor, most commonly, Advantech, located at www.advantek.com -- note the difference in spelling between their company name and their domain name. This board uses the Tseng4000 chip which is fully supported in linux. It works well with both SVGA lib and in XF86. I prefer standard VGA displays over esoteric displays such as the Private Eye, because this makes debugging and testing easier, and allows for a greater degree of interoperability. Specifically, I find that the Private Eye gives me a headache over extended usage. (I tend to wear my rig sometimes more than 16 hours a day, over several weeks.) Since the Private Eye is a binary red-only display, it is not well suited to personal imaging applications (and the color is part of the reason it gives me a headache). The Private Eye is also difficult to obtain, owing to its esoteric nature (e.g. it is not manufactured in large volumes).
Over the last 20 years of WearComp, various display standards have come and gone, and one standard that has remained has been NTSC. Modern versions of WearComp are leaning toward use of NTSC displays, which tend to have very good color rendition, so most of the recent designs use full 24 bit color. I will discuss NTSC versus VGA later. In any case, both NTSC and VGA are likely to remain for some time, and are good choices as display formats.
Once you have decided which boards to assemble, lay these out on a clean surface. Be careful not to get small blobs of solder, metal flakes, or the like, on the boards, since the very fine traces are quite susceptible to short circuits. Also, if you have not had experience pulling the boards apart without bending the pins, you may wish to plan ahead to minimize wear and tear. For example with the 100MHz 486 CoreModule, connect the hard drive cable (and set appropriate jumpers) prior to assembling the stack together, as it is inaccessible once in between boards.
The boards are easy to assemble. The fact that I have a visual record of this assembly is yet another example of the utility of personal imaging -- much of my work in this area is documented from the first-person perspective of the apparatus I wear. For example, the assembly of the first version of WearComp6 was documented by WearComp5 which I was wearing at the time. This provided a video sequence showing the assembly procedure. In Fig 8, I have selected six frames from this video sequence in order to illustrate the assembly of WearComp6.
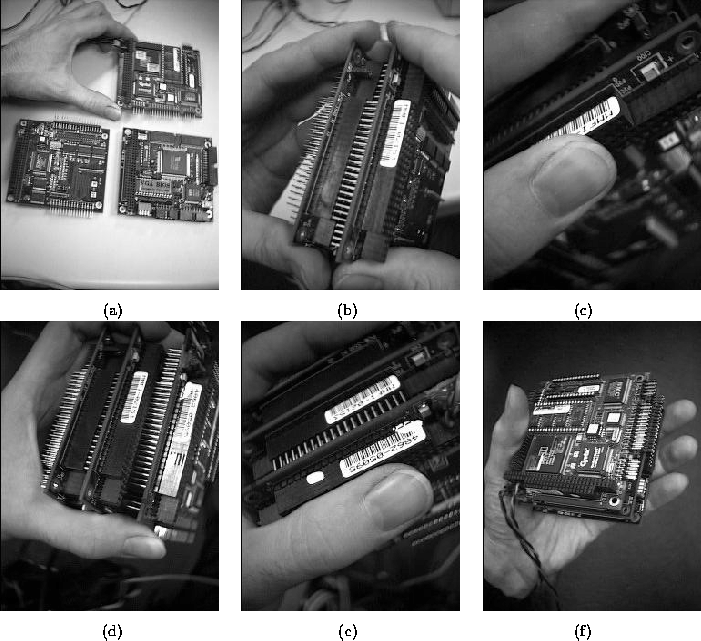
Figure 8:
Decide which PC104 boards you wish to use.
Generally the Ampro CoreModule is selected,
together with the Advantech VGA board, and
perhaps a third board (such as video capture board,
sound board, analog to digital converter, etc.)
for some additional functionality.
(a) Pictured here are boards from an early version of WearComp6
that required a separate floppy disk and IDE controller.
Newer core modules include this functionality, so that
you may only need two boards (CoreModule and VGA), unless
you wish to have extra functionality.
(b) Put the first two boards together; carefully insert pins
from one, into the other. It is a lot easier to insert (put
together) than to remove (take apart) without bending the pins.
Therefore, prior to insertion, decide on the odering of the
boards (e.g. which should go on top). With experience, you
will learn how to pull apart boards without bending the pins,
but you should either practice on old boards, or plan carefully
so pulling apart is not necessary.
When I am using a
video capture board, I put that on top because it generates
most heat compared to its level of
sensitivety to heat (tendency to overheat). Consider also
which board you will want easiest access to (e.g. in case you
need to change jumpers). The video capture board is the
most troublesome in this regard, hence another reason for
putting it on top of the stack. If you have only a 2-board
stack, consider putting the CPU on top.
I usually put the VGA board on the bottom of the stack
because it is the cheapest board, and the one for which I
am most willing to cut off the bottom pins. You can save
space in the whole stack by cutting off all the pins on the
bottommost board. Be sure to think carefully and test carefully
prior to this committment, as this commits you to making that
board the bottom board from then on.
(c) Once pins are aligned, press the first two boards together.
(d) If a third board is going on your stack, align it next.
It is easier to add one board at-a-time than it is to
press together all three.
(e) Press the new board together onto the rest of the stack.
(f) You now have a battery-operatable multimedia computer in
the palm of your hand. Test it thoroughly for
functionality in your selected board-ordering
before cutting off the bottom pins.